
QuickBooks Time is Intuit’s time tracking and workforce management solution designed to help businesses track employee hours, manage schedules, and streamline payroll. Formerly known as TSheets, it has evolved into a comprehensive platform that works seamlessly with QuickBooks Online and QuickBooks Desktop, making it easier to manage time and payroll from one place.
Whether you’re exploring QuickBooks Time for the first time or looking to get more from your existing subscription, this guide will help you understand how it works and how to use it effectively.
QuickBooks Time is a time tracking and workforce management solution by Intuit that helps businesses track employee hours, manage schedules, and simplify payroll processes. It was previously known as TSheets before Intuit acquired the platform and later rebranded it as QuickBooks Time.
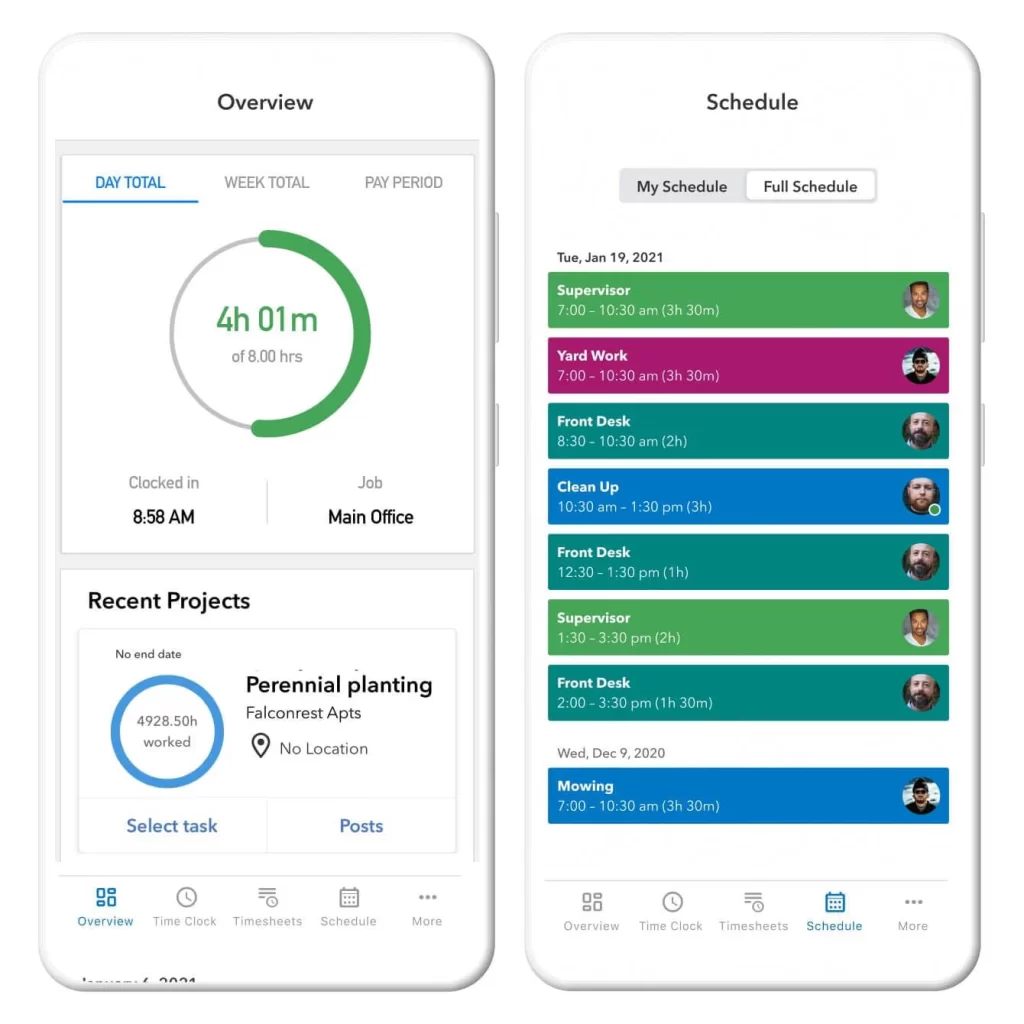
With QuickBooks Time, businesses can track time through mobile apps, web browsers, or a shared kiosk, making it easier for employees to record hours, breaks, overtime, and job-related activities. It also connects with QuickBooks Online and QuickBooks Desktop to sync timesheets, improve payroll accuracy, and manage labor costs more efficiently.
Note: QuickBooks Desktop Discontinued: Your Guide to Switch/Survive
Many users still search for TSheets because QuickBooks Time was previously known by that name. Intuit acquired TSheets and later rebranded it as QuickBooks Time, but the core time tracking functionality remains largely the same.
The main difference is that QuickBooks Time is now positioned as part of the QuickBooks ecosystem, with closer integration for payroll, invoicing, employee scheduling, and job costing.
| TSheets | QuickBooks Time |
| Original product name | Current Intuit brand name |
| Standalone time tracking solution | Integrated with QuickBooks products |
| Separate branding | Part of the QuickBooks ecosystem |
| Existing users transitioned | New users sign up under QuickBooks Time |
QuickBooks Time helps businesses simplify employee time tracking, scheduling, and payroll management with tools designed for both office and field teams. Its key features include:
Employees can track their work hours using the QuickBooks Workforce mobile app, web dashboard, or a shared Time Clock Kiosk. Businesses can capture accurate hours, breaks, and job-related time from anywhere.
QuickBooks Time allows businesses to monitor where and when employees clock in or out. GPS tracking and location-based features help improve accountability for remote and mobile teams.
Create and manage employee schedules, share shifts, and keep teams updated about their work timings. Employees can view their schedules and receive notifications about upcoming shifts.
Managers can review, edit, and approve employee timesheets before sending hours to payroll. This helps reduce manual errors and keeps payroll processing more organized.
Track time against customers, projects, service items, or jobs to understand how employees spend their working hours and improve project management.
QuickBooks Time provides reports that help businesses review employee hours, overtime, project costs, and overall workforce activity.
While the features above explain what QuickBooks Time can do, the benefits below show how those tools help businesses improve accuracy, save time, and manage their workforce more effectively.
QuickBooks Time offers two subscription plans with features tailored to businesses of different sizes. Compare the available plans, pricing, and included features below to choose the one that best fits your workforce management needs.
| Feature | Premium | Elite |
| Starting Price | $20/month base fee + $8 per user/month* | $40/month base fee + $10 per user/month* |
| Best For | Small and growing teams that need accurate time tracking | Businesses managing projects, field teams, and advanced workforce operations |
| Mobile Time Tracking | ✓ | ✓ |
| QuickBooks Workforce App | ✓ | ✓ |
| Payroll & Invoicing Sync | ✓ | ✓ |
| Paid Time Off Management | ✓ | ✓ |
| Custom Alerts & Notifications | ✓ | ✓ |
| Time Kiosk | ✓ | ✓ |
| Unlimited Customer Support | ✓ | ✓ |
| Project Tracking | — | ✓ |
| Project Activity Feed | — | ✓ |
| Timesheet Signatures | — | ✓ |
Note: QuickBooks Time pricing and included features may change over time. The listed prices are based on Intuit’s standard published rates and may be subject to promotional discounts or future updates. The monthly base fee typically includes one admin, while additional users are billed separately.
QuickBooks Time generally supports the latest versions of major web browsers, along with the two preceding versions. Older browser versions may not be fully supported.
Note: Internet Explorer is no longer supported.
Note: If you’re using macOS, you’ll need to install the Firefox PDF plugin to preview and print forms.
Once you’ve subscribed to QuickBooks Time, the next step is to connect it with QuickBooks Online so employee hours, customers, and payroll data can sync seamlessly.
The steps below will help QuickBooks Online users connect QuickBooks Time, configure payroll and overtime settings, add your team, and choose how employees will track their hours:
Note: QuickBooks Workforce Premium and Elite subscriptions already include QuickBooks Time.
If you don’t have QuickBooks Time yet:
To start the setup:
Your QuickBooks Online company information is automatically synced with QuickBooks Time, so you’ll only need to configure the remaining setup details manually.
After connecting your account, the next step is to configure payroll-related settings so timesheets are recorded and transferred correctly.
Note: If you’re using Intuit QuickBooks Workforce, configure your pay period settings there before proceeding. Otherwise, continue with the steps below.

Before configuring overtime in QuickBooks Time, verify that overtime pay is enabled in each employee’s payroll profile. Otherwise, overtime hours may be processed as regular hours.
Note: You can return to Company Settings at any time to adjust additional preferences and personalize the setup for your business.
Important Note: This feature is available only with an active QuickBooks Payroll subscription.
Payroll items from QuickBooks are automatically matched with the corresponding time types in QuickBooks Time. Review these mappings to ensure employee hours are transferred using the correct pay rates.

Note: For more advanced payroll tracking, you can also map payroll items to service items or class types.
Once payroll and overtime settings are configured, you can add employees and choose how your team will track time.
The next step is to add your team and configure how they’ll track their work hours in QuickBooks Time.

You can set up breaks and time off in QuickBooks Online, so your team can accurately record breaks and leave hours.
Note: Items that sync from QuickBooks Online or Intuit QuickBooks Workforce, including employees, contractors, customers, payroll items, service items, billable items, classes, and locations, must be managed from those products.
If you want your team to track time by service items, billable items, or classes:

Invite team members to track time
Read More: QuickBooks Online New Features and Updates 2026: Everything to Know
Before starting the integration, make sure QuickBooks Desktop is updated and opened in Single-user mode. The steps below cover the required setup, payroll configuration, employee setup, and syncing process.
Before you begin the integration, keep the following prerequisites and key points in mind:
Before starting the integration, ensure that QuickBooks Desktop is properly set up and ready to connect with QuickBooks Time:
| Steps | Notes and instructions |
| 1. Open the QuickBooks Desktop company file you want to connect with QuickBooks Time. Make sure you’re signed in as the Admin user and the file is opened in Single-user mode. | To verify that you use Single-user mode:
|
| 2. Turn on time tracking. |
|
| 3. Configure the payroll features. |
|
| 4. Configure the starting day of the week in QuickBooks Desktop. |
|
| 5. Configure the week start day in QuickBooks Time. |
|
| 6. If you haven’t already, add the employees and vendors (including admins) in QuickBooks Desktop whose timesheets you want to manage. | |
| 7. Configure your employees’ payroll details in QuickBooks Desktop. |
Note: QuickBooks Time only transfers payroll items, not employee pay rates. Make sure the pay rates match in both QuickBooks Time and QuickBooks Desktop.
|
| 8. (Optional) To enable time data for creating paychecks for all employees, follow these steps. |
|
| 9. (Optional) To track time for vendors, follow these steps. |
|
You can connect QuickBooks Time with QuickBooks Desktop using either a trial account or an existing QuickBooks Time account:
If you don’t have a QuickBooks Time account yet, you can start with a free trial and connect it with QuickBooks Desktop. Follow these steps to get started.
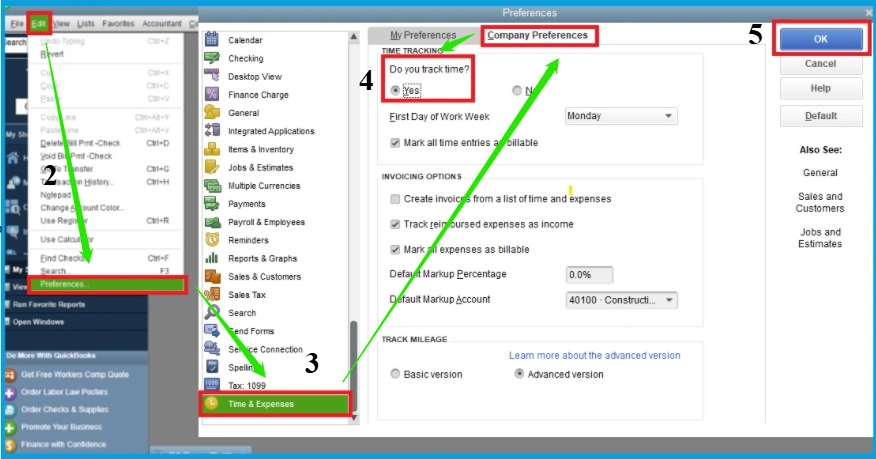
If you already have a QuickBooks Time account, you can connect it with your QuickBooks Desktop company file using the following steps.
Review and adjust your QuickBooks Time settings based on your business requirements. This ensures a smooth first-time sync between QuickBooks Time and QuickBooks Desktop.
| Steps | Notes and instructions |
| 1. Launch QuickBooks Time from QuickBooks Desktop. |
|
| 2. Learn how data syncs between QuickBooks Time and QuickBooks Desktop. | Notes:
|
| 3. Approve timesheets in QuickBooks Time to ensure they are ready for export to QuickBooks Desktop. Follow these steps: |
|
| 4. Let’s map your payroll items. | Note: Each employee must have at least one payroll item assigned in QuickBooks Time before their hours can be exported to QuickBooks Desktop. Follow these steps to map payroll items in QuickBooks Time. |
| 5. Configure time off settings to ensure they map and sync properly between QuickBooks Time and QuickBooks Desktop. |
Note: If you don’t want unpaid time off hours to appear in QuickBooks Desktop, use unpaid breaks instead.
|
| 6. (Optional) Customize integration preferences. You can update the sync settings between QuickBooks Time and your QuickBooks Desktop company file whenever needed. |
|
| 7. Sync your data. |
|
| 8. (Optional) Update your data after syncing. You can make any necessary changes to your information after the sync is complete. |
Note: To reactivate a customer in QuickBooks Time:
|
QuickBooks Time doesn’t directly integrate with QuickBooks Desktop for Mac. If you’re using the Mac version, Intuit recommends using the built-in time tracking and timesheet features available in QuickBooks Desktop for Mac.
You can access QuickBooks Time from a web browser or through your connected QuickBooks Online or QuickBooks Desktop account. Simply sign in using your Intuit account credentials. If you’re logging in from a browser, enter your email address and password, then complete the verification process if prompted.
For QuickBooks Online and QuickBooks Desktop users, open the Time or QuickBooks Time option after signing in to your company file. Once authenticated, you’ll be taken to your QuickBooks Time dashboard, where you can manage employee time, schedules, and timesheets.
QuickBooks Time lets employees record their work hours from a web browser, the QuickBooks Workforce mobile app, or a shared Time Clock Kiosk. Managers can then review and approve timesheets before syncing them with payroll.
QuickBooks Time helps businesses keep track of employee hours, overtime, time off, and project-related work through detailed reports. These insights make it easier to review labor costs, manage schedules, and understand how time is being spent.
Earlier, QuickBooks Time (formerly TSheets) was often used as a separate time tracking solution that required additional setup for payroll connections. Now, it works directly with QuickBooks Online and QuickBooks Desktop, allowing users to sync timesheets and transfer approved hours for payroll processing without managing a separate time tracking system.
With QuickBooks Time, businesses can map payroll items, send approved timesheets, and keep employee time data organized for accurate payroll and job costing. The integration helps reduce manual work and keeps accounting and payroll information connected.
If you can’t sign in to QuickBooks Time, the issue is usually related to your account credentials or verification process. Here are a few common problems and their solutions:
Other common causes include browser cache issues, outdated app versions, incorrect Intuit account credentials, or problems with two-step verification. Checking these settings can often resolve login problems before contacting support.
Note: If the issue persists after trying these steps, contact QuickBooks Support or refer to our detailed QuickBooks Time Login troubleshooting guide for advanced solutions.
If QuickBooks Time doesn’t meet your business needs or budget, there are several other time tracking solutions worth considering. While each platform offers its own set of features, the right choice depends on your team size, payroll requirements, and project management needs.
If you already use QuickBooks Online or QuickBooks Desktop, however, QuickBooks Time remains one of the most convenient options because it integrates directly with your accounting and payroll workflow.
QuickBooks Time is easy to use, but setting it up, connecting it with payroll, or fixing sync issues can still take time. If you run into any problems, the certified QuickBooks professionals at BooksMerge are available to help.
Connect our team at +1-866-513-4656 when you need help with:
Whether you’re getting started with QuickBooks Time or need help with an existing setup, BooksMerge can help you get everything working correctly without the hassle.
QuickBooks Time makes it easier to track employee hours, manage schedules, and streamline payroll for businesses of all sizes. Whether you’re setting it up for the first time or integrating it with QuickBooks Online or Desktop, understanding its features can help you get the most out of the platform.
If you need expert assistance with setup, integration, or troubleshooting, the certified professionals at BooksMerge are here to help.
QuickBooks Time (formerly TSheets) is a cloud-based time-tracking and employee-scheduling app by Intuit “designed to help you track time, create invoices, and calculate payroll.”
To complete your QuickBooks Time login, visit the QuickBooks Time sign-in page and enter your Intuit email address and password. If prompted, verify your identity using the one-time code sent to your registered email or phone. Once verified, you’ll be signed in to your QuickBooks Time account.
No, QuickBooks Time isn’t included with a standard QuickBooks Online subscription. You can purchase it as a separate add-on or get it included with QuickBooks Online Payroll Premium and Elite plans.
Yes, QuickBooks Time works directly with QuickBooks Desktop, allowing you to sync employee hours, manage job costs, and streamline payroll.
QuickBooks Time pricing depends on the plan you choose. At the time of writing, Premium and Elite plans include a monthly base fee plus an additional per-user monthly charge. Because pricing may change, it’s best to check Intuit’s current pricing before subscribing.
You can track time using QuickBooks Time through the QuickBooks Workforce mobile app or a centralized Time Clock Kiosk on a shared device. Both options make it easy for employees to clock in and out while keeping time records accurate.
To add holiday pay in QuickBooks Time, create a paid time off (PTO) or Holiday pay code in your payroll settings, then assign it to the employee’s timesheet for the applicable date. After approving the timesheet, sync it with QuickBooks Payroll so the holiday hours are included in payroll processing.
QuickBooks Time is used by small businesses, field service teams, and professional service providers to track employee hours, manage payroll, and handle project scheduling.
Yes, QuickBooks Time is the renamed version of TSheets. Intuit acquired TSheets and later rebranded it as QuickBooks Time, while keeping the core time tracking functionality.
Yes, QuickBooks Time can track employee GPS location when they clock in and out, which is helpful for mobile and field-based teams.
Enable QuickBooks Time, add your employees or contractors, and let them track their hours using the web dashboard, mobile app, or Time Clock Kiosk. Once you approve the timesheets, you can sync them with QuickBooks Payroll or QuickBooks Desktop.
AI-triaged.
Human-solved.
Instant QuickBooks diagnostics, then a certified ProAdvisor takes over live.
first-call fix
match time
live coverage
