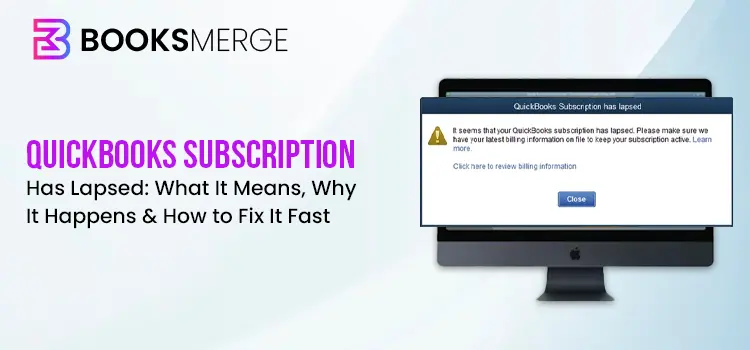
An error message saying your QuickBooks subscription has lapsed or expired can disrupt your workflow and stop you from using key features such as payroll, bank feeds, software updates, and other subscription-based services.
The confusion can arise because of the difference between the general subscription lapsed meaning and what the error is actually about. Often, users have reported that they continued seeing this error even though they have an active subscription. While the error often appears when your subscription expires, it can also result from billing issues, license verification problems, or damaged QuickBooks files.
In this guide, you’ll learn what “your QuickBooks subscription has expired or lapsed” error means, why it occurs, and the most effective ways to fix it. We’ll also show you how to renew your QuickBooks Desktop subscription and prevent the issue from happening again.
QuickBooks subscription has lapsed or expired error means that QB could not verify an active subscription linked to your account. This usually happens when your subscription expires, a payment fails, billing information is outdated, or there is a delay in subscription verification.
Depending on your QuickBooks version, you may see different messages, such as:
“Your QuickBooks subscription has expired.”
“QuickBooks says subscription expired. Please renew to continue.”
“QuickBooks has reached the expiration date and will no longer open company files.”
“Subscription inactive.”
In some cases, the warning might appear during login or while accessing certain features. The message generally means QuickBooks is unable to confirm that your subscription is active.
Some users also report situations like, “I just subscribed to QuickBooks and got suspended within a minute.” This usually happens when the subscription activation has not synced properly with your account. It does not always mean your payment failed or your subscription was cancelled.
A lapsed or expired subscription does not delete your QuickBooks data. Your company file, invoices, customer details, and accounting records remain intact.
However, some subscription-based features may become unavailable until you renew your subscription. These may include:
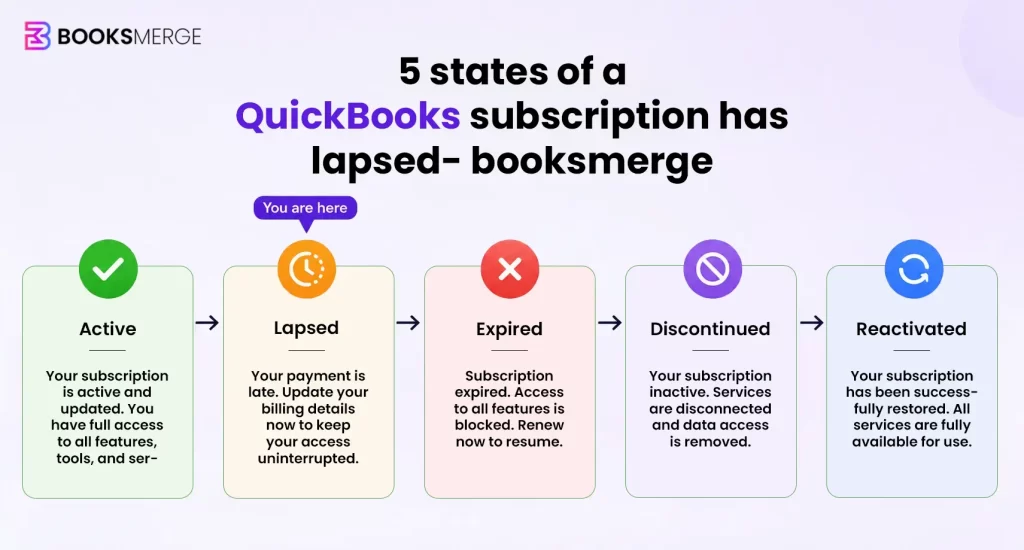
Although these terms may sound similar, they refer to different situations:
A discontinued version is different from a lapsed subscription because renewing your plan may not restore discontinued services. You may need to upgrade to a supported QuickBooks version instead.
The QuickBooks subscription has lapsed error can occur for several reasons, from billing problems to issues with QuickBooks files or license verification. Below are some common causes behind this error:
Expired payment methods, failed transactions, or outdated billing details can prevent QuickBooks from verifying your subscription.
An older QuickBooks Desktop version may have trouble connecting with Intuit’s subscription verification servers.

Corruption or deletion of the EntitlementDataStore.ecml file can stop QuickBooks from validating your license and subscription details during startup.
Firewall settings, antivirus programs, or network issues may block QuickBooks from connecting to Intuit servers.
Missing or damaged program files can affect subscription and license verification.
Wrong date or time settings on your computer can interrupt the subscription validation process.
Corrupted registration components may prevent QuickBooks from recognizing your subscription.
QuickBooks may fail to sync your subscription details with Intuit servers due to temporary connection issues.
A lapsed QuickBooks subscription or the QuickBooks reactivate subscription not working problem can restrict access to important features, but the issue can usually be resolved with a few troubleshooting steps.
Below are 9 effective solutions to fix the QuickBooks subscription has lapsed error and restore access to your QuickBooks account.
If your QuickBooks Desktop subscription is active and you still see the “QuickBooks Has Lapsed” error, your payment details may be out of date.
Let’s update the payment details for your subscription in the Customer Account Management (CAMPs) portal:
Incorrect system date and time settings can interfere with QuickBooks subscription verification. Make sure your Windows clock is synced correctly before checking the subscription again:
Either you can set automatic updates, or you can initiate an immediate QuickBooks Desktop update
a. Schedule automatic updates
b. Run an immediate update
You might encounter subscription issues if the product and license information file on your hard drive is damaged or otherwise corrupted. Restoring the file is quite easy. Here’s how to do it:

A secure and active internet connection is the source of software updates.
To test if your internet connection is secure, open a web browser and visit Chase Banking.
If you fail to open the Chase Banking page, it means the internet connection isn’t secure, and you won’t get updates from QuickBooks. Reach out to your internet service provider (ISP) for help.
If you can open the Chase Banking page, launch QuickBooks Desktop, and then proceed with the following steps:
Keep the following in mind:
- Download managers may disrupt the update process, so make sure to turn them off before downloading updates. For additional assistance, contact your Internet Service Provider (ISP).
- If you are using a dial-up connection, ensure that your connection speed is at least 28.8 Kb/s.
- For users of AOL, try signing in with the primary account username and confirm that Parental Controls are disabled. More details can be found through AOL’s online support resources.
Internet security or personal firewall application settings
Internet security programs or firewall configurations may block the update process.
Check your Internet security and personal firewall settings to ensure they are configured correctly.
Make sure that ports 80 and 443 are open, and allow access to the following files:
If all of these ports are already occupied by other processes, which is highly uncommon, the QuickBooks Database Server automatically switches to an alternative port, 56719.
After the software has been reinstalled, enter your license key and product number to reactivate the application and restore full functionality.
a. Find your license number
Log in to your Customer Account Maintenance Portal (CAMPS) account to view your license and product numbers. After noting both numbers, continue to the next step.
b. Activate QuickBooks again
This should take care of the QuickBooks Desktop subscription expired problem, and the desktop application should work fine now. However, if the error persists, you can still try these troubleshooting steps.
Verify that the appropriate file permissions are set so all authorized users and services can securely access the QuickBooks company files without interruptions.
a. Verify that permissions are set correctly
If the folder permissions are not configured properly, follow these steps:
b. Change folder permissions
If you need to modify the folder permissions, follow these steps:
Follow these steps for any of the folders listed below.
Note: that some folders may not appear on your system, as they can vary depending on the version of QuickBooks Desktop you use:
However, if you still find QuickBooks reactivate subscription not working, try the next step.
Let’s repair the QuickBooks Desktop installation using different tools in QuickBooks Tool Hub to ensure the subscription lapsed issue is resolved:
a. Run Quick Fix my Program
The Quick Fix my Program closes the QuickBooks processes running in the background and then runs a quick repair on them.
b. Run the QuickBooks Install Diagnostic Tool
If the QuickBooks installation fails to complete or if something goes wrong, it could cause problems when you try to use it. Let’s run the QuickBooks Install Diagnostic Tool to resolve the common installation issues:
You can access your company file data offline if the QuickBooks Subscription Has Lapsed error isn’t resolved. Here’s how to do it:
Yes, you may still be able to access QuickBooks Desktop Plus after your subscription expires, but with limited functionality. Your company file and accounting data remain available, but several connected services and features stop working.

After your subscription ends, QuickBooks does not delete your company file. You can still open the software and view important records, including:
However, access may be limited depending on your QuickBooks version and subscription status.
Once the subscription becomes inactive, several features may stop working, including:
QuickBooks Online and QuickBooks Desktop handle expired subscriptions differently.
With QuickBooks Online, access becomes restricted after the subscription period ends. Once the grace period is over, you may no longer be able to access your company books until you reactivate your account.
With QuickBooks Desktop Plus, you may still be able to open your company file and view historical data for a limited period after expiry.
QuickBooks Desktop Plus generally provides limited access for up to a year after the subscription expires. During this period, subscription-based features remain unavailable unless you renew your plan.
If you know your subscription will not be renewed, it is recommended to export important reports and create a backup of your company file to avoid any future access issues.
Once the installation and repair steps are complete, you can proceed with renewing your QuickBooks Desktop subscription to ensure uninterrupted access to payroll, updates, and connected services.
If your subscription became inactive because of expired payment details or a billing issue, you can restore it from within QuickBooks Desktop:
If you need to purchase a new plan or officially renew your lapsed status online:
If you’re thinking, “I just paid my first subscription in QuickBooks and got suspended in the next minute,” you’re not alone. This usually happens when QuickBooks hasn’t finished syncing your payment or verifying your subscription with Intuit’s servers. In most cases, syncing your license data online, restarting QuickBooks, and signing in with the correct Intuit account resolves the issue.
To confirm everything is working properly:
If the issue continues, updating QuickBooks to the latest release often helps reconnect the license information.
If you have already tried to reactivate your QuickBooks subscription but the lapsed error is still showing, follow these specific steps.
You should go to File > Close Company and then quit QuickBooks completely. Do not merely minimize the window.
Go to Help > Sync License Data Online. This forces QuickBooks to check your subscription status with Intuit’s servers.
Go to Help > Manage My License > Sync License Data Online if your version of QuickBooks provides this option.
Visit the CAMPs website, go to the Intuit Customer Account Management Portal at camps.intuit.com, and log in. Make sure that your subscription status is displayed as Active. If it shows Inactive or Lapsed, then your payment may not have been processed. You should first update your billing method.
If your payment has been confirmed but the error continues, wait up to 24 hours. Sign out and sign back in after waiting to allow the subscription status to update.
Make sure the card saved in your Intuit account is not expired. An expired card can stop reactivation from completing, even after you try to renew.
Have your subscription confirmation email and billing information ready, so support can verify your payment and subscription status.
QuickBooks Desktop 2024 is the last version released for many Desktop products. Renewing your subscription is now mainly about maintaining access to connected services, updates, and support rather than upgrading to a new yearly version.
An active subscription allows you to continue using features like payroll, payment processing, bank feeds, and customer support. Your company data remains stored on your computer even if your subscription expires, and renewing your plan can restore access to subscription-based features.
Need help with the QuickBooks Subscription Has Lapsed issue? BookMerge is here to provide you with assistance with subscription issues, discontinuities, and more. Contact us now! or call us at +1-866-513-4656.
Taking a few preventive steps can help you avoid subscription interruptions and keep QuickBooks Desktop running smoothly:
Make sure your payment method linked to your Intuit account is active and up to date to avoid failed renewals.
Turning on auto-renewal helps prevent service interruptions caused by missed renewal dates or delayed payments.
Verify the saved card details and ensure they are valid. When you update the expired information, it helps avoid failed transactions and subscription problems.
Review renewal reminders, payment notifications, and billing alerts to resolve issues before they affect your subscription.
Manage subscription and billing settings through an account with proper admin access to avoid permission-related issues.
Regularly sync your license data to ensure QuickBooks can verify your subscription details correctly.
Make sure to update your QuickBooks Desktop regularly to access the latest features, bug fixes, and security improvements. This way you can also help prevent verification and compatibility issues.
Create regular backups of your company files to keep your financial data safe. Having a recent backup makes it easier to restore your information quickly whenever needed.
Review your subscription status occasionally to ensure your account remains active and functioning properly. Regular checks can help you catch billing, payment, or renewal issues early before they interrupt your access.
No. If you cancel your QuickBooks subscription or let it lapse, QuickBooks will not delete your data. Your company file, invoices, customer records, employee information, and accounting history stay saved on your computer. If the subscription lapses, you may lose access to payroll processing, bank feeds, cloud backups, software updates, and technical support. Those subscription-based features will start working again when you reactivate your subscription.
Your QuickBooks company file is yours because it lives on your computer and isn’t deleted when a subscription lapses or is canceled.
Whether your QuickBooks subscription has lapsed or expired, the issue usually comes down to an inactive subscription, a billing problem, or a license verification failure. Your company data is not automatically deleted when a subscription becomes inactive. However, subscription-dependent features such as payroll, bank feeds, and updates may be restricted.
Start by checking your subscription and payment status in your Intuit account. If your subscription is active but QuickBooks still shows an expired or lapsed message, sync your license data, update the desktop application, and follow the troubleshooting steps above.
Once your subscription is successfully reactivated, QuickBooks should restore the subscription-based services associated with your plan. If the error persists after a confirmed renewal, Intuit support can help verify your account and subscription status.
You can easily regain access to your accounting tools, payroll services, and company data without major disruptions with the help of BookMerge Professional. Dial +1-866-513-4656 to connect with an expert now.

The “QuickBooks subscription has lapsed” error means that your paid plan is temporarily inactive, usually because a renewal payment failed or the subscription cycle ended. You may lose access to payroll, live updates, or your company files until you resolve the billing issue.
Yes, you can still access your data, but your access will be limited and time-sensitive. You may be unable to open your company file or even run day-to-day business operations.
To fix a lapsed QuickBooks subscription, simply update your expired payment information in your account portal or reactivate your QuickBooks subscription. If these steps do not work, it means either the EntitlementDataStore.ecml file might be damaged, or your system does not allow you enough permission to access the software.
You may see that your QuickBooks subscription has lapsed even if you have already paid due to sync issues, outdated software or billing information, system lag, or the file that stores the subscription or software info gets damaged.
In QuickBooks, a lapsed subscription means it is temporarily inactive—usually due to a billing issue like a declined card or payment failure. An expired subscription means your billing cycle has officially ended or been canceled.
No, when your QuickBooks Desktop subscription expires, you lose the ability to create new invoices, write checks, or edit any transactions. The software enters a “read-only” or view-only mode for exactly one year, allowing you to open your company file and run reports, but nothing more.
Renew your QuickBooks Desktop subscription either directly inside the software or via your online account. Most users either turn on auto-renew or process payments through the official QuickBooks Account Management Portal.
The “Service Has Expired” message usually appears when QuickBooks cannot verify that a subscription is active. To fix it, verify that your subscription is active, update your billing information if necessary, sync your license data online, install the latest QuickBooks updates, and restart the software.
When a subscription is described as “lapsed,” it means the subscription is no longer active because a renewal was missed, a payment failed, or the billing cycle ended. When you try to renew it, “lapsed” simply indicates that the service needs to be reactivated before you can continue using it normally.
Renewal confirmation can take up to 24 hours to sync with QuickBooks. Sign out of QuickBooks completely, wait 15 minutes, then sign back in. Go to Help, then select Sync License Data Online to force a license check. If the error continues after 24 hours, contact Intuit support and have your renewal confirmation number ready. The billing may have gone through, but your account may not have updated automatically.
This message appears when Intuit’s authorization token for your account has expired, usually after a long period of inactivity or following a billing change. This is different from a standard subscription lapse. To fix it, sign out of your Intuit account in QuickBooks, then sign back in to reauthorize the connection between your QuickBooks software and your Intuit account. If signing back in does not resolve the issue, go to camps.intuit.com and verify that your account is active.
QuickBooks locks subscription-dependent features when a subscription lapses, not your account or data. You can still open QuickBooks and view your company file. The locked features (payroll, bank feeds, and software updates) restore automatically once you reactivate your subscription. A subscription lapse never deletes your invoices, customer records, or accounting history.
This is usually a license sync failure. QuickBooks cannot verify your active subscription with Intuit’s servers. First, go to Help, followed by Sync License Data Online. If that doesn’t resolve it, sign out of your Intuit account in QuickBooks and sign back in to force a license recheck. If your subscription is active in your Intuit account but QuickBooks still doesn’t recognize it, contact Intuit support to resolve the issue.
In some cases, Intuit automatically adjusts subscription tiers when an account lapses and then reactivates, particularly if a promotional or grandfathered pricing plan was in place. If your subscription tier changed after reactivation and you didn’t request the change, contact Intuit billing support directly and ask them to restore your original plan. Have your account history and previous billing confirmation ready when you contact support.
AI-triaged.
Human-solved.
Instant QuickBooks diagnostics, then a certified ProAdvisor takes over live.
first-call fix
match time
live coverage