As businesses increasingly rely on multi-user access to collaborate within QuickBooks, a stable connection between workstations becomes essential. However, you may run into QuickBooks Error H202 when trying to open or access a company file stored on another system in the network.
This issue can hamper your access to shared data and affect daily accounting tasks, especially in multi-user environments. It is usually caused by network configuration issues, incorrect hosting setup, or QuickBooks services that are not running properly on the server system.
In this guide, we’ll break down what error code H202 means, the reasons behind it, and the step-by-step methods you can use to fix it and restore smooth multi-user access.

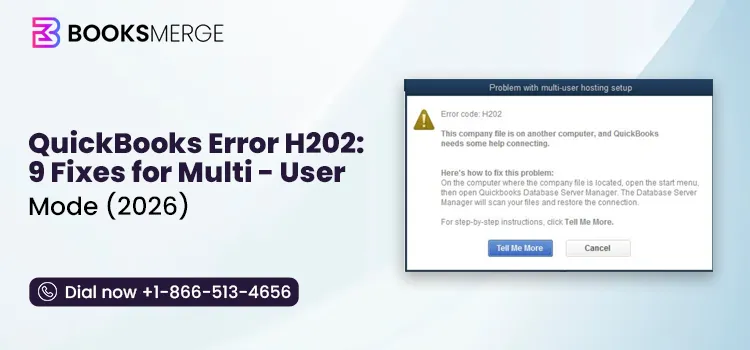
QuickBooks error H202 appears when the software tries to switch to multi-user mode but cannot connect to the computer that stores the company file. In simple terms, QuickBooks knows where the file is, but it cannot reach the server that hosts it.
When this error appears, QuickBooks usually prevents you from accessing or opening a company file on the network. You may see a message indicating that the file is located on another computer and that QuickBooks needs help connecting to it. In some cases, the system may also freeze or take longer than usual while trying to establish the connection.
Error H202 means that you won’t be able to access your company file on the multi-user network. Your workstation cannot communicate properly with the server hosting the company file. This is often caused by blocked ports, incorrect hosting setup, disabled QuickBooks services, or firewall/antivirus restrictions that interrupt the connection between systems.
Yes, in most cases, your company file is safe. H202 is not a data damage error. It does not usually affect or corrupt your financial data. The file remains on the server, but users are temporarily unable to access it over the network. Once the connection issue is fixed, access is typically restored without any data loss.
Although these errors look different, they all relate to multi-user connectivity issues in QuickBooks.
While the error codes are different, the root causes are similar, such as hosting issues, firewall blocks, or network configuration. This also means the troubleshooting steps we will be discussing can also apply to resolving the other HXXX errors.
Before you start applying fixes, take a moment to answer the following questions. Your answers can help narrow down the root cause of QuickBooks Error H202 and guide you toward the most effective solution.
The first thing to check is whether you can open the company file on the server computer. If the file opens successfully on the server but not on other workstations, the issue is likely related to network communication. However, if the file won’t open on the server either, the problem may be with the company files themselves or the QuickBooks installation on the host system.
When multiple users receive error H202, the server or network is usually the common factor. But if only one employee is seeing the error while everyone else works normally, focus your troubleshooting on that specific workstation instead of the entire network.
If you encountered error H202 right after a recent update, it may indicate automatic changes to the hosting or firewall configuration. Updates to QuickBooks, Windows, or security software can modify network settings and disrupt communication between QuickBooks and the server. If the error started immediately after an update, reviewing those changes should be one of the first troubleshooting steps.

Let’s go through the most common reasons why this error appears so you can quickly understand what might be causing it:
Possible damages or corruption to your QuickBooks company file can prevent QuickBooks from connecting to the host computer and can trigger error code H202.
You might not be running QuickBooks Database Server Manager, or it might be improperly configured, which can block multi-user communication when hosting a company file.
If services such as QuickBooksDBXX or QBCFMonitorService are stopped, workstations may be unable to access the company file and may encounter error code H202.
Missing or incorrect permissions for QuickBooks services can prevent access to shared company files over the network, leading to connectivity issues.
Hosting enabled on multiple computers or disabled on the server can disrupt communication between workstations and the host computer.
The Windows Firewall restrictions may block the network ports required by QuickBooks to host a company file or to run other operations, preventing communication with the host system.
Antivirus software may mistakenly block QuickBooks services, executable files, or network ports, causing interruptions in multi-user connectivity.
The DNS configuration issues, server name resolution failures, or unstable network connections may interrupt communication between workstations and the host computer.
The damaged, corrupted, or outdated QuickBooks installation may contain missing program files or components, affecting network connectivity and preventing QuickBooks from functioning properly in multi-user mode.
Let’s go through the top solutions step by step in a clear order, so you can identify what’s causing QuickBooks error H202 and fix it without confusion or skipping anything important:
Let’s run the QuickBooks File Doctor utility to automatically diagnose and fix issues preventing QuickBooks from functioning properly.
Important Note: Make sure to download and install QuickBooks Tool Hub (1.6.0.8) in the most recent release.

Note: If you fail to open the QB File Doctor, search for QuickBooks Desktop File Doc on Windows and open the tool manually.
If your workstations are able to access multi-user mode without any problems, the issue has been resolved.
The server computer is the system where your QuickBooks company files are stored, while the other network-connected computers act as workstations.

If the issue is still unresolved, the problem may be with QuickBooks services running on the host computer, which can directly trigger QuickBooks error H202.
Important: If you’re using the full QuickBooks program on the server computer, make sure multi-user hosting is enabled before proceeding.
Open QuickBooks on the server system and navigate to File > Utilities. If you see Host Multi-User Access, click it to enable hosting. However, if “Stop Hosting Multi-User Access” appears instead, hosting is already enabled, so leave the setting unchanged.
To ensure QuickBooks can communicate properly across your network, verify that the required QuickBooks services are running on the server computer. Start by checking QuickBooksDBXX, then repeat the same steps for QBCFMonitorService.


Go to File and choose Switch to Multi-user Mode. If QuickBooks opens successfully in multi-user mode on all workstations, the issue has been resolved.
If you haven’t already, grant QuickBooksDBXX and QBCFMonitorService administrator permissions on your server computer. Refer to the Windows file-sharing permission instructions if needed.
If the permissions are not configured correctly, update them using the following steps:

Once finished, open QuickBooks on both the server and workstation computers. If Error H202 persists, continue to Solution 5.
Only the server computer should host your company files. Make sure Multi-User Hosting is disabled on all workstations (the computers that access, but do not store, the company file).
Note: You can perform these steps without opening a company file.

Once you’ve checked all workstations, switch to the server computer, which hosts your company files.
Make sure your firewall isn’t blocking QuickBooks from communicating with other computers on the network. Open the Windows Firewall settings on the server and add exceptions for QuickBooks and its related ports. This allows smooth data flow in multi-user mode and helps prevent connection issues like error H202.

Temporarily disable the Windows Defender Antivirus and Firewall protection before you try to access or open a company file on the network.
Turn Off Virus & Threat Protection

Turn Off Firewall Protection

If the error persists, test the connection between your workstations and server by pinging the server from each affected workstation.
First, enable Network Discovery on both the server and any workstations displaying error H202:
Next, find your server name:

Return to the workstation that’s displaying Error H202. If you’re not comfortable with network troubleshooting, consider consulting an IT professional.

If you notice packet loss or unusually slow response times, the issue is likely network-related. In that case, contact an IT professional to diagnose and resolve the network problem before continuing.
If the error still isn’t resolved after trying the previous steps, a fresh reinstall may be necessary.
Before proceeding, make sure you have the following:
Note: You can also access your license and product details through your QuickBooks account management portal.

If these options aren’t available, sign out of Windows and sign back in using an administrator account or a user with admin privileges.
Once the uninstall process is complete, reinstall QuickBooks Desktop. During installation, QuickBooks automatically creates new program folders and renames the old ones.
Follow these steps to install or reinstall QuickBooks on a single computer.

Note: If you’re moving QuickBooks to a different computer, consider using the QuickBooks Migrator Tool to transfer your files and settings.
Once you’ve applied the fixes, take a few minutes to verify that everything is working as expected:
If everything is working fine after a restart, the next step is making sure the issue doesn’t return:
QuickBooks company file error H202 may continue to appear even after applying the recommended troubleshooting method. If this happens, you must understand the circumstances and try to resolve the error again, or you can connect with a QuickBooks ProAdvisors for an easy resolution.
If you encounter error code H202 after moving QuickBooks to a new computer or server, it could be due to incorrect hosting settings on the new computer, not running the QuickBooks Database Server Manager, or not having enough network permissions.
During the migration process, some QuickBooks services may not be configured properly, preventing workstations from communicating with the company file on the server computer. Reviewing the hosting configuration and network setup can help resolve the issue.
Sometimes, QuickBooks error code H202 may also appear after updating or upgrading QuickBooks to a newer version. This can happen if the update changes network settings, making it challenging to share a company file on the network or access it.
Make sure that all computers are running the same QuickBooks version, and restarting the required services can often fix the problem.
Users working in hosted or cloud environments may encounter error H202 due to server connectivity issues, restricted access permissions, or interruptions within the hosting network.
Since company files are stored remotely, even a minor connection problem can prevent QuickBooks from accessing the file. Checking the hosting provider’s server status and verifying user permissions can help restore access.
QuickBooks may display error H202 when accessed through a VPN or Remote Desktop connection if the network is unstable or communication between the workstation and server is interrupted. Slow internet speeds, VPN restrictions, or improper network configuration can all contribute to the error.
Testing the connection and ensuring stable access to the server can help eliminate these issues.
As discussed above, QuickBooks error H202 can usually be resolved by correcting network-related issues, reviewing hosting settings, and ensuring the required QuickBooks services are running properly. In most cases, checking firewall permissions, verifying server communication, and using QuickBooks Database Server Manager are enough to restore multi-user access.
If the error continues to appear, especially in complex networks or hosted environments, consult a QuickBooks professional at BooksMerge to identify the root cause and resolve the issue quickly.
QuickBooks error H202 occurs when a workstation cannot connect to the company file stored on the server in multi-user mode. This usually happens because of network communication issues, incorrect hosting settings, blocked firewall ports, or services that are not running properly.
To fix QuickBooks error H202, verify that multi-user hosting is enabled only on the server, run QuickBooks File Doctor, check firewall settings, ensure QuickBooks services are running, and confirm that the company file folder has the correct permissions. These steps typically restore the connection between the workstation and the server.
When error code H202 appears on all workstations, the issue is usually related to the server rather than individual computers. Common causes include a stopped QuickBooks Database Server service, incorrect hosting configuration, blocked network ports, or firewall settings preventing access to the company file.
Both errors are multi-user mode issues, but they occur under different circumstances. Error H202 appears when a workstation cannot connect to the server hosting the company file. Error H505 typically occurs when QuickBooks detects that a workstation is incorrectly set up to host the company file instead of the designated server.
QuickBooks uses specific network ports to support multi-user access. The exact port numbers vary depending on your QuickBooks Desktop version. These ports must be open in Windows Firewall and any third-party security software to allow proper communication between the server and workstations.
QuickBooks error H202 may return if the underlying network issue has not been fully resolved. Recurring causes include firewall updates, antivirus restrictions, changes in network settings, damaged QuickBooks services, or incorrect hosting configurations that reappear after system updates.
Yes, many users can resolve QuickBooks Error H202 without professional IT assistance. Basic troubleshooting steps such as running QuickBooks File Doctor, checking hosting settings, restarting QuickBooks services, and reviewing firewall permissions often resolve the problem. However, advanced network issues may require technical support.
No, QuickBooks error H202 does not usually indicate a corrupted company file. The error is primarily related to network connectivity and communication between the workstation and the server. In most cases, the company file remains intact and accessible once the connection issue is resolved.
How to Upgrade QuickBooks Desktop to 2024: Pro, Premier & Enterprise Step-by-Step Guide (2026)
Read More